Box Property Expressions
This guide is intended for advanced users of Enterprise Lens, who are comfortable with editing JSON and familiarising themselves with basic ideas featured in programming.
This guide also assumes you have built your illustrations using Name Associations.
In more complicated or intricate illustrations, you may want to extend the ability of your boxes beyond simply showing/hiding a value, border or style. For example you may want to:
- Represent your boxes as a Gantt Chart or Bar Graph
- Show additional information when you hover over a box
- Change the appearance of a box or information according to the value of attribute(s)
- Display attribute value(s) differently according to certain criteria
By the end of this guide, you should gain a holistic appreciation how Box Property Expressions work, and their various applications.
1. The Basics
Before we get started, we need to understand what Box Property Expressions are.
A Box Property Expression is a statement used to add or change the appearance of a box.
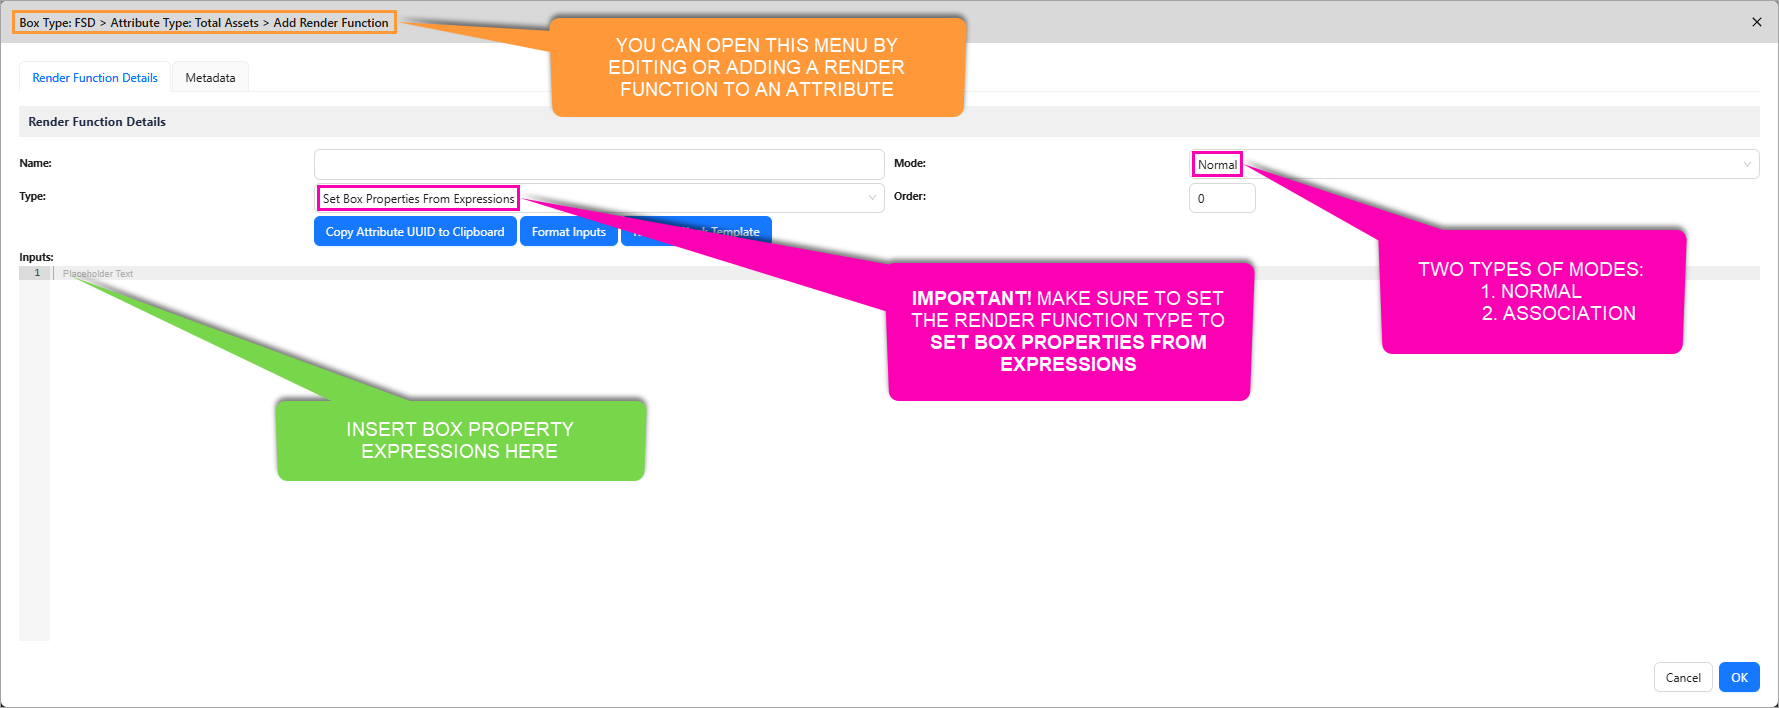
Box Property Expressions can only be created inside a specific type of Render Function, to do this:
- Open a Box Type in the Left Hand Menu
- Select the Attribute Types tab in the Edit Box Type Menu
- Edit an Attribute from the list provided
- Open the Render Functions tab in the new Edit Attribute Type Menu
- Either click Add or Edit next to an existing Render Function
From here, make sure to set the Render Function type to Set Box Properties from Expressions
Without the correct Render Function type, the JSON featured later in this guide will not work!
1.1. JSON Structure
The basic template for any Box Property Expression's Render Function looks like this:
{
  "boxPropertyExpressions": {
    "key": "expression"
  },
  "constants": {
    "customkey": "value"
  },
  "variables": [
    {
      "name": "name",
      "sourceType": "globalBoxChildrenById",
      "globalBoxUuid": "UUID"
    },
    {
      "name": "name",
      "sourceType": "expression",
      "expression": "variableexpression"
    }
  ]
}
It's essential to understand the JSON structure above is being evaluated for every visible box that has this render function.
- The boxes that have this render function are ones which have the same Box Type which has this Attribute, and subsequently this Render Function
Once the Render Function is turned on, the JSON is ran for each visible box from the perspective of the box.
- Example: The render function has a box property expression to change colour where the attribute is low
- Boxes with the render function will check inside themselves for the value of the attribute, if it is low, the colour of the box will change
1.1.1. boxPropertyExpressions
- The
keyreferences the box property you are changing to match theexpression - The
expressionreferences the expression you are setting to change that box property
Expressions can be comprised of simple statements, here are three examples:
Example 1. Change Text Colour
{
  "boxPropertyExpressions": {
    "textColor": "if (attr == \"Low\") { \"MediumSeaGreen\" } else { None }"
  }
}
Here we have one expression which changes the Text Colour of a Box if the attribute is equal to Low.
textColoris the Box Propertyif (attr == \"Low"\) { \"MediumSeaGreen\" } else { None }is the Expression
Example 2. Change Border Colour
{
  "boxPropertyExpressions": {
    "borderColor": "if (attr == \"Low\") { \"Blue\" } else { None }"
  }
}
Here we have one expression which changes the Border Colour of a Box if the attribute is equal to Low.
borderColoris the Box Propertyif (attr == \"Low"\) { \"Blue\" } else { None }is the Expression
Example 3. Change Text Size
{
  "boxPropertyExpressions": {
    "textSizeinPixels": "if (attr == \"Low\") { \"24\" } else { None }"
  }
}
Here we have one expression which changes the Text Size of a Box if the attribute is equal to Low.
textSizeinPixelsis the Box Propertyif (attr == \"Low"\) { \"24\" } else { None }is the Expression
Here is what that all three examples look like put together.
Example 4. Change Text Colour, Size, and Border Colour
{
  "boxPropertyExpressions": {
    "textColor": "if (attr == \"Low\") { \"MediumSeaGreen\" } else { None }",
    "borderColor": "if (attr == \"Low\") { \"Blue\" } else { None }",
    "textSizeinPixels": "if (attr == \"Low\") { \"24\" } else { None }"
  }
}
Here you can see the previous three expressions merged together. You can view the explanation for any one of these by clicking on the previous dropdowns.
1.1.2. Constants
These are static pieces of information that you can reference in box property expressions and variables.
Modifying our previous examples, we can use constants like so:
Example 1. Change Text Colour
{
  "boxPropertyExpressions": {
    "textColor": "if (attr == constants.criteria) { \"MediumSeaGreen\"  } else { None }"
  },
  "constants": {
    "criteria": "Low"
  }
}
The expression has been modified to check if the attribute equals the criteria constant:
- To reference a constant
- First define it below the box property expression. Note the syntax used above
- Insert
constants.followed by the name of the constant wherever you wish to reference it
- In this case, the constant
criteriawas referenced in the Box Property Expressioncriteriais set tolow, so the expression is still checking if the attribute is low (same as before) and setting the Box Text Colour to Green if it is low
Example 2. Change Border Colour
{
  "boxPropertyExpressions": {
    "borderColor": "if (attr == constants.criteria) { \"Blue\"  } else { None }"
  },
  "constants": {
    "criteria": "Low"
  }
}
The expression has been modified to check if the attribute equals the criteria constant:
- To reference a constant
- First define it below the box property expression. Note the syntax used above
- Insert
constants.followed by the name of the constant wherever you wish to reference it
- In this case, the constant
criteriawas referenced in the Box Property Expressioncriteriais set tolow, so the expression is still checking if the attribute is low (same as before) and setting the Border Colour to Blue if it is low
Example 4. Change Text Size
{
  "boxPropertyExpressions": {
    "textSizeInPixels": "if (attr == constants.criteria) { \"24\"  } else { None }"
  },
  "constants": {
    "criteria": "Low"
  }
}
The expression has been modified to check if the attribute equals the criteria constant:
- To reference a constant
- First define it below the box property expression. Note the syntax used above
- Insert
constants.followed by the name of the constant wherever you wish to reference it
- In this case, the constant
criteriawas referenced in the Box Property Expressioncriteriais set tolow, so the expression is still checking if the attribute is low (same as before) and setting the Text Size to 14 pixels if it is low
Here is what all three examples look like put together.
Example 4. Change Text Colour, Size, and Border Colour
{
  "boxPropertyExpressions": {
    "textColor": "if (attr == constants.criteria) { \"MediumSeaGreen\"  } else { None }",
    "borderColor": "if (attr == constants.criteria) { \"Blue\"  } else { None }",
    "textSizeInPixels": "if (attr == constants.criteria) { \"24\"  } else { None }"
  },
  "constants": {
    "criteria": "Low"
  }
}
Here you can see the previous three expressions merged together. You can view the explanation for any one of these by clicking on the previous dropdowns.
The same constant is reused as all expressions check if the attribute is Low, eliminating the need to define three constants.
1.1.3. Variables
These are expressions that can be referenced in other variables and box property expressions.
This is particularly useful when you want to clearly break up your expressions and set things out in a logical order.
Adding onto our previous examples, here is what a new variable could look like:
Example 1. Change Text Colour
{
  "boxPropertyExpressions": {
    "textColor": "variables.evaluate_criteria"
  },
  "constants": {
    "criteria": "Low"
  },
  "variables": [
    {
      "name": "evaluate_criteria",
      "sourceType": "expression",
      "expression": "if (attr == constants.criteria) { \"MediumSeaGreen\" } else { None }"
    }
  ]
}
Notice how the box property expression has changed:
- A variable has been referenced
- The variable, called
evaluate_criteriawas defined below the constants- It's
sourceTypeis an expression, this allows the variable to evaluate an expression - In the
expressionfield, we inserted the previous statement:if (attr == constants.criteria) { \"MediumSeaGreen\" } else { None }
- It's
- The variable was then referenced in
textColorby enteringvariables.followed by the name (evaluate_criteria)
- The variable, called
Example 2. Change Border Colour
{
  "boxPropertyExpressions": {
    "borderColor": "variables.evaluate_criteria"
  },
  "constants": {
    "criteria": "Low"
  },
  "variables": [
    {
      "name": "evaluate_criteria",
      "sourceType": "expression",
      "expression": "if (attr == constants.criteria) { \"Blue\" } else { None }"
    }
  ]
}
Notice how the box property expression has changed:
- A variable has been referenced
- The variable, called
evaluate_criteriawas defined below the constants- It's
sourceTypeis an expression, this allows the variable to evaluate an expression - In the
expressionfield, we inserted the previous statement:if (attr == constants.criteria) { \"Blue\" } else { None }
- It's
- The variable was then referenced in
borderColorby enteringvariables.followed by the name (evaluate_criteria)
- The variable, called
Example 3. Change Text Size
{
  "boxPropertyExpressions": {
    "textSizeInPixels": "variables.evaluate_criteria"
  },
  "constants": {
    "criteria": "Low"
  },
  "variables": [
    {
      "name": "evaluate_criteria",
      "sourceType": "expression",
      "expression": "if (attr == constants.criteria) { \"24\" } else { None }"
    }
  ]
}
Notice how the box property expression has changed:
- A variable has been referenced
- The variable, called
evaluate_criteriawas defined below the constants- It's
sourceTypeis an expression, this allows the variable to evaluate an expression - In the
expressionfield, we inserted the previous statement:if (attr == constants.criteria) { \"24\" } else { None }
- It's
- The variable was then referenced in
textSizeInPixelsby enteringvariables.followed by the name (evaluate_criteria)
- The variable, called
Here is what all three examples look like put together.
Example 4. Change Text Colour, Size, and Border Colour
{
  "boxPropertyExpressions": {
    "textColor": "variables.evaluate_text_colour_criteria",
    "borderColor": "variables.evaluate_border_colour_criteria",
    "textSizeInPixels": "variables.evaluate_text_size_criteria"
  },
  "constants": {
    "criteria": "Low"
  },
  "variables": [
    {
      "name": "evaluate_text_colour_criteria",
      "sourceType": "expression",
      "expression": "if (attr == constants.criteria) { \"MediumSeaGreen\" } else { None }"
    },
    {
      "name": "evaluate_border_colour_criteria",
      "sourceType": "expression",
      "expression": "if (attr == constants.criteria) { \"Blue\" } else { None }"
    },
    {
      "name": "evaluate_text_size_criteria",
      "sourceType": "expression",
      "expression": "if (attr == constants.criteria) { \"24\" } else { None }"
    }
  ]
}
Here you can see the previous three expressions merged together. You can view the explanation for any one of these by clicking on the previous dropdowns.
Given each criteria evaluates a different outcome, each criteria is given a unique variable to be referenced in their respective box property expressions.
The same outcomes are achieved, but instead the individual expressions are shifted inside variables. The box property expressions are shorter because it references the variable, which will either return the colours/sizes or nothing at all.
1.1.4. Illustration Example
Using the final combined JSON featured in 1.1.3. we can see how this looks in practice.
- Download this illustration by clicking here.
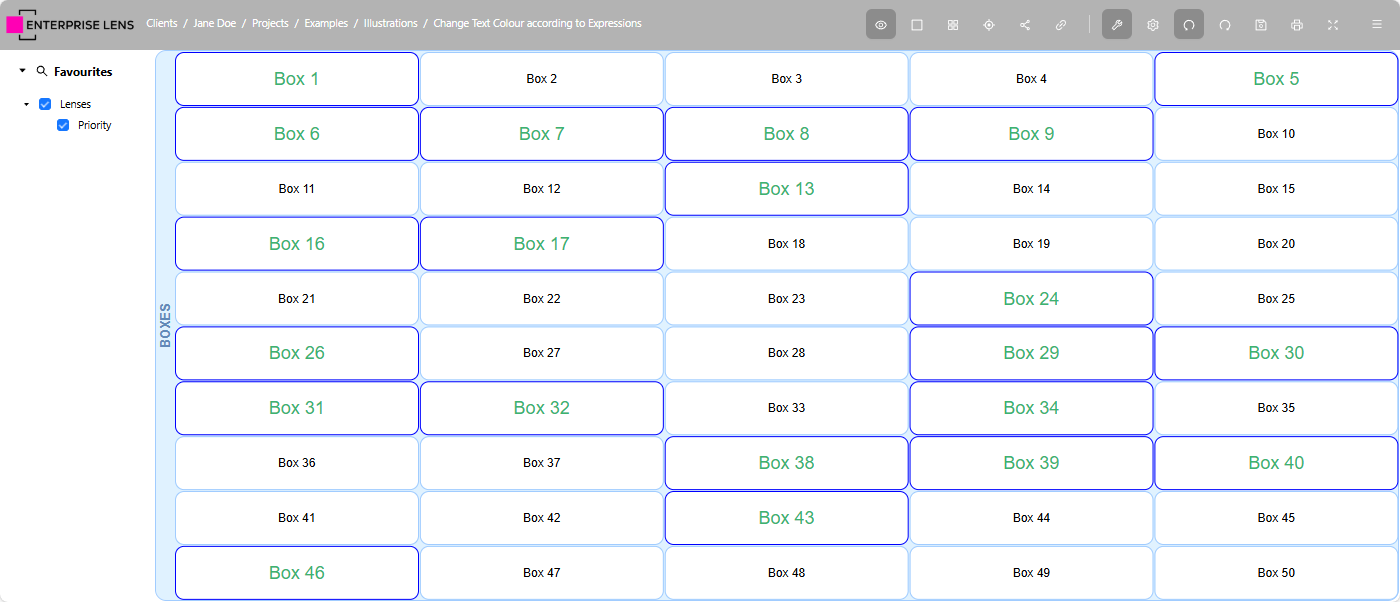
In this example, we applied the expression to the Priority attribute.
- When turned on, the render function is ran per box
- Each box checks itself to see if Priority is set to Low (
Priority == Low)- If Priority is set to
Low, the expression is TRUE and the following occur:textColoris set toMediumSeeGreenborderColoris set toBluetextSizeInPixelsis set to24
- If Priority is not set to
Low, the expression is FALSE and the following occurs:textColoris set toNoneborderColoris set toNonetextSizeInPixelsis set toNone- Since we haven't defined
Noneanywhere, all the above properties do not get changed and remain their defaults
- If Priority is set to
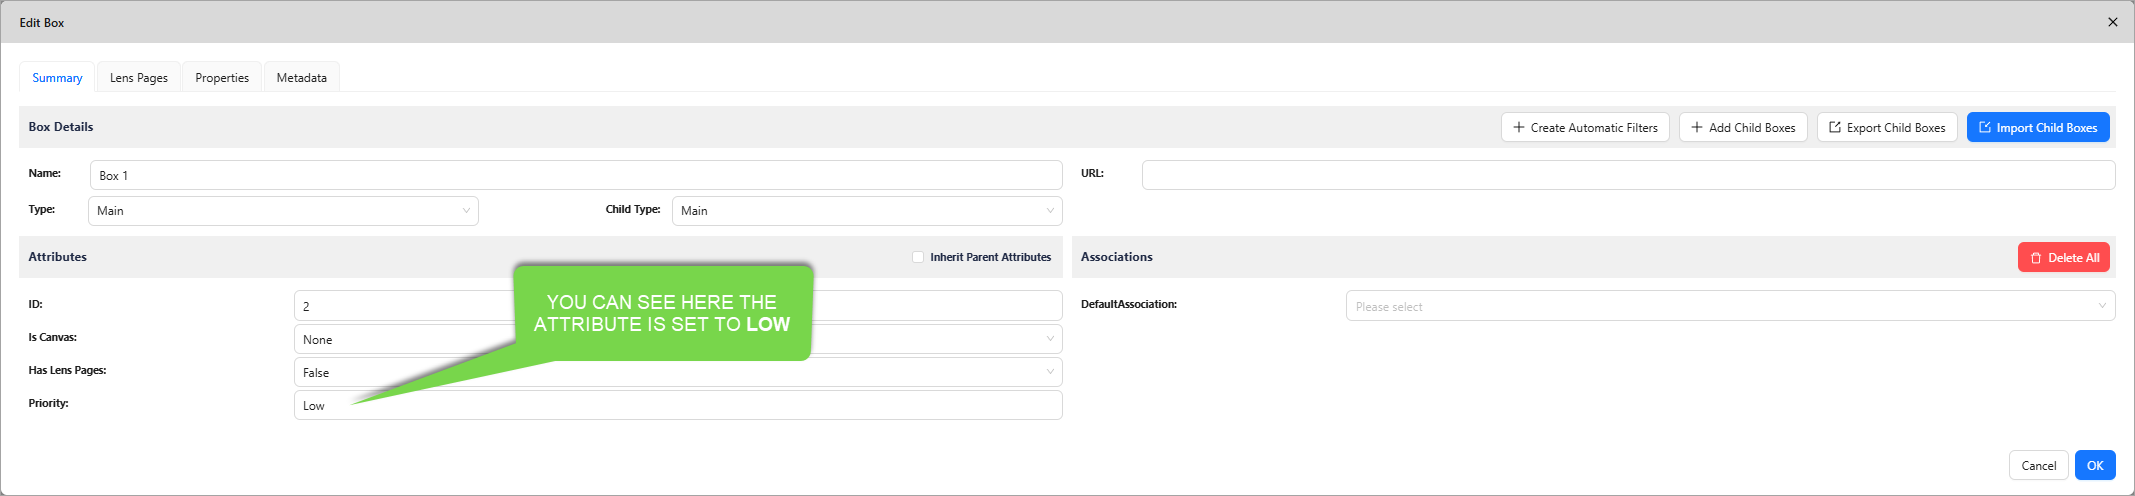
Clicking on Box 1, which has green text, you can see the Priority attribute is set to Low.
2. Aggregation
A use case for Box Property Expressions is the ability to run arithmetic across ranges of boxes, this is what's known in Enterprise Lens as aggregation.
Aggregation is still done via a Box Property Expression, run from the perspective of the box type that contains the Render Function.
-
In order for arithmetic to be useful, we usually confine the arithmetic we run to specific ranges of boxes
- The most common way we do this is by imposing restrictions on an Associations basis
-
Two common ways to restrict the range of boxes to do arithmetic on are:
- First Level Boxes
- Second Level Boxes
Both levels of aggregation are explained below.
2.1. First Level
This is where you aggregate the immediate boxes that join the boxes containing the Aggregate Render Function.
- e.g. "I would like to count the Project boxes that contain a Cost, which belong to their respective Business Functions"
- e.g. "I would like to count the Project boxes, which belong to their respective Business Functions"
- e.g. "I would like to add the Costs of Application boxes, which belong to their respective Business Functions"
Render Function belongsIn all these scenarios, the Project/Application boxes belong to the Business Functions.
Since Business Functions are the highest level in these scenarios, we make the Aggregate Render Function on the Business Functions Box Type.
2.2. Second Level
This is where you aggregate the boxes that join to the immediate boxes, which in turn join to the boxes with the Arithmetic Render Function.
- e.g. "I would like to count the Project boxes that contain a Cost, which belong to their respective Business Functions, which in turn belong to their respective Business Strategies"
- e.g. "I would like to count the Project boxes, which belong to their respective Business Functions, which in turn belong to their respective Business Strategies"
- e.g. "I would like to add the Costs of Application boxes, which belong to their respective Business Functions, , which in turn belong to their respective Business Strategies"
Render Function belongsWhile the Project/Application boxes belong to the Business Functions, we have specified that those Business Functions belong to Business Strategies.
Since Business Strategies are the highest level in these scenarios, we make the Aggregate Render Function on the Business Strategy Box Type.
2.3. Render Function
The below render function should be considered your starting point to building any aggregate, we will first explain how it works before sharing the numerous ways to modify it.
{
  "boxPropertyExpressions": {
    "badge24": "{ \"text\": variables.rounded_aggregate, \"horizontalPositionInPercent\": 50,  \"verticalPositionInPercent\": 100, \"verticalAlignment\": \"none\",  \"horizontalAlignment\": \"none\", \"borderRadius\": 5,  \"backgroundColor\": \"Tomato\",  \"textColor\": \"White\",  \"width\": \"20%\", \"height\": \"20%\", \"fontFamily\": \"Arial\", \"textSizeInPixels\": 16  }"
  },
  "constants": {
    "association": "association_attribute_name",
    "number_1": "1st_attribute_name",
    "number_2": "2nd_attribute_name",
    "number_3": "3rd_attribute_name"
  },
  "variables": [
    {
      "name": "boxes",
      "sourceType": "globalBoxChildrenById",
      "globalBoxUuid": "boxes_uuid"
    },
    {
      "name": "aggregate",
      "sourceType": "expression",
      "expression": "variables.boxes.sum(b => (toNumber(b[constants.number_1]) + toNumber(b[constants.number_2]) + toNumber(b[constants.number_3])) * (strCount(b[constants.association], current.Name) > 0))"
    },
    {
      "name": "rounded_aggregate",
      "sourceType": "expression",
      "expression": "round(variables.aggregate, 2)"
    }
  ]
}
2.4. Box Property Expression
Notably, the only box property key being modified is badge18.
- This specific badge was selected as it is the least likely to conflict with any other badges you may be using, however it can be changed to any of the following:
badge1,badge2,badge3,badge4,badge5,badge6,badge7,badge8,badge9,badge10,badge11,badge12,badge13,badge14,badge15,badge16,badge17,badge18,badge19,badge20,badge21,badge22,badge23,badge24,badge25,badge26,badge27,badge28,badge29,badge30,badge31,badge32
- Start by changing the badge number if your aggregate fails to show!
The aggregate is displayed by way of badge18, with the value of the box property key containing:
- Badge JSON syntax - this contains styling for the badge that shows the aggregate number. e.g.
textColoris#000000(Black) - The aggregate value to display - the final number shown as your aggregate value is set as
text, and is the Rounded Sum variable (variables.rounded_aggregate)
2.5. Constants
These contain the bits of information required to do your aggregation in the later defined variables. Let's break down what each constant does:
association- the value of this constant should be the the name of the Association Attribute that joins the boxes from/to the box type that contains this render function- i.e. If
Projectshas an attribute calledJOIN TO Business Functions - The value of
associationsshould then be JOIN TO Business Functions - To fetch the correct attribute name, you can view the steps in section 2.7.2.1.
- i.e. If
number_1- the value of this constant should be the name of the Attribute you want to aggregate- i.e. if
Projectshas an attribute calledAssets Costyou want to sum - The value of
associationsshould then be Assets Cost
- i.e. if
number_2- the value of this constant should be the name of the Attribute you want to aggregate- i.e. if
Projectshas an attribute calledInvestment Costyou want to sum - The value of
associationsshould then be Investment Cost
- i.e. if
number_3- the value of this constant should be the name of the Attribute you want to aggregate- i.e. if
Projectshas an attribute calledCapital Costyou want to sum - The value of
associationsshould then be Maintenance Cost
- i.e. if
Make sure to type all Attribute Names accurately, include any spaces and capital letters.
2.6. Variables
These contain the boxes to aggregate and the arithmetic that is calculated.
2.6.1 boxes
This is a special type of variable, known as a Global Box
- This variable contains all the boxes to apply arithmetic to
- It's
sourceTypeisglobalBoxChildrenById, this means the variable provides a list of all child boxes that are in a certain box globalBoxUuidis value of the variable, that is the UUID of the box containing the list of all child boxes- e.g. There is a box called
Projectswhich contains all the Project boxes
- e.g. There is a box called
- To fetch this UUID, you can view the steps in section 2.7.2.3.
- Click on the box that contains all the boxes inside it that you wish to apply arithmetic to
- Copy the UUID located on the top right of the Edit Box Menu
2.6.2 aggregate
This is where the aggregation happens, let's break down each component of the variable's expression:
variables.boxes.sum(b => ... )- This performs addition on each box contained in the Boxes variable (
variables.boxes) - The
b =>indicates that each box (b) is added up individually according to the conditions to the right of the arrow
- This performs addition on each box contained in the Boxes variable (
(toNumber(b[constants.number_1]) + toNumber(b[constants.number_2]) + toNumber(b[constants.number_3]))- This finds all the attribute in a box (as specified by their names in the constants section earlier) and adds them together
- Each attribute is first converted to a number before being added, by
toNumber()
- Each attribute is first converted to a number before being added, by
- The
bin front of each[constants.number_X]means that each box's own attribute is added
- This finds all the attribute in a box (as specified by their names in the constants section earlier) and adds them together
* (strCount(b[constants.association], current.Name) > 0))- The added attributes are then multiplied by this condition
- The
strCountchecks if the Associations Attribute specified earlier, in each box, has the name of the box that the aggregate function applies to- If it does contain the box name, it returns 1
- If it does not contain the box name, it returns 0 and the attributes of that box are not added
- It is impossible that the
strCountreturns a number greater than 1, as in Enterprise Lens you cannot select the same box in a Name Association attribute multiple times
To illustrate the condition, let's look an example:
- Business Function 1 joins to Projects 1 and 2
- Projects 1 and 2 have an association attribute which contains the value
Business Function 1, this means they are joined to that business function - Project 3 joins to a different Business Function
Let's now apply the relevant parts of the aggregate variable in this scenario:
(toNumber(b[constants.number_1]) + toNumber(b[constants.number_2]) + toNumber(b[constants.number_3]))- All Project boxes (1, 2, and 3) have their attributes summed up
* (strCount(b[constants.association], current.Name) > 0))- Only Project boxes 1 and 2 return 1, as it is joined to Business Function 1
- This means if their each of their attributes added to 5, they are counted in the final sum as
5*1=5
- This means if their each of their attributes added to 5, they are counted in the final sum as
- Project 3 returns 0, as it is NOT joined to Business Function 1
- This means even if this Project's attributes added up to 5 too, it would not be counted as
5*0 = 0
- This means even if this Project's attributes added up to 5 too, it would not be counted as
- Only Project boxes 1 and 2 return 1, as it is joined to Business Function 1
- The final sum as such is
5+5+0=10
2.6.3 rounded_aggregate
This is the variable that is displayed in the badge and viewed in the illustration. It has only one component:
round(variable.aggregate, 2)- This rounds the first input, which is the aggregate variable Sum (
variable.sum) by the second input which is 2 - e.g. If the aggregate sum of all boxes is 639.4426 it will be rounded to 639.45!
- This rounds the first input, which is the aggregate variable Sum (
2.7. Example Complete Aggregate Render Function
Below, is an aggregate of People per State.
- Mousing over WA, you can see all Projects that belong to WA
- We can verify the calculations by summing all the highlighted boxes, like so:
11+69+31+98+94+58=361
- We can verify the calculations by summing all the highlighted boxes, like so:

2.7.1. Viewing the Render Function
In Edit Mode, you can view the Render Function. Below are the steps involved in doing this:
- Open the
StateBox Type - In the
Attributes Typetab, click Edit next toCount of People - In the
Render Functionstab, click Edit next toPeople per State
Below is the Render Function pasted in whole. You can find an annotated version of this Render Function at the end of this section.
{
  "boxPropertyExpressions": {
    "badge24": "{ \"text\": variables.rounded_aggregate, \"horizontalPositionInPercent\": 50,  \"verticalPositionInPercent\": 100, \"verticalAlignment\": \"none\",  \"horizontalAlignment\": \"none\", \"borderRadius\": 5,  \"backgroundColor\": \"Tomato\",  \"textColor\": \"White\",  \"width\": \"20%\", \"height\": \"20%\", \"fontFamily\": \"Arial\", \"textSizeInPixels\": 16  }"
  },
  "constants": {
    "association": "State",
    "number_1": "People",
    "number_2": "",
    "number_3": "",
    "number_4": ""
  },
  "variables": [
    {
      "name": "boxes",
      "sourceType": "globalBoxChildrenById",
      "globalBoxUuid": "8b841eb1-b57f-4ef0-9d91-bb22bb376f58"
    },
    {
      "name": "aggregate",
      "sourceType": "expression",
      "expression": "variables.boxes.sum(b => (toNumber(b[constants.number_1]) + toNumber(b[constants.number_2]) + toNumber(b[constants.number_3])) * (strCount(b[constants.association], current.Name) > 0))"
    },
    {
      "name": "rounded_aggregate",
      "sourceType": "expression",
      "expression": "round(variables.aggregate, 2)"
    }
  ]
}
Annotated - Example Complete Aggregate Render Function

2.7.2. Edits made to the Render Function
Rather than re-explain how this render function works, we will run through what we needed to edit from the Render Function contained in [2.3. Render Function](#23-Render Function). We have only changed the following:
associationconstantnumber_1-3constantsboxesvariable UUID
We could have modified the sum to be a count or average, changed the display properties in `
2.7.2.1. association
This contains the name of the association attribute used to join the Project boxes to the States boxes
-
As with any two way association, there is an association attribute on both
StateandProjectbox types, that allows you to hover over either type of box and see all associations -
To find the correct association attribute name, here is the method we used:
-
Click on any
Statebox in Edit Mode, as pictured below
-
Check under Associations if there is an entry field which reveals the Project(s) the State box is joined to If there is NO entry field, then do not use this attribute's name.
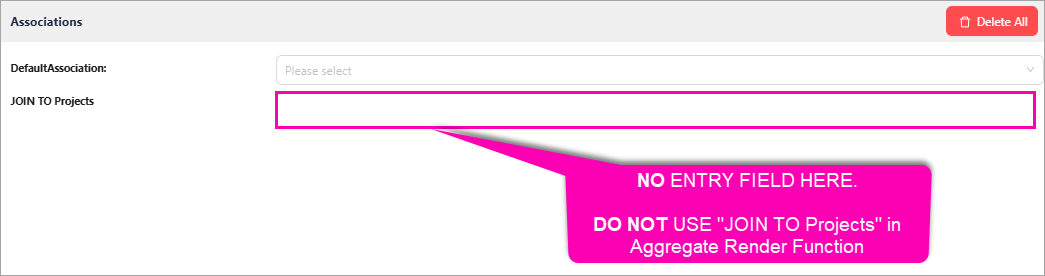 Seeing as there is no entry field. This is not the attribute name we should use.
 -
Instead, click on any
Projectbox in Edit Mode, as pictured below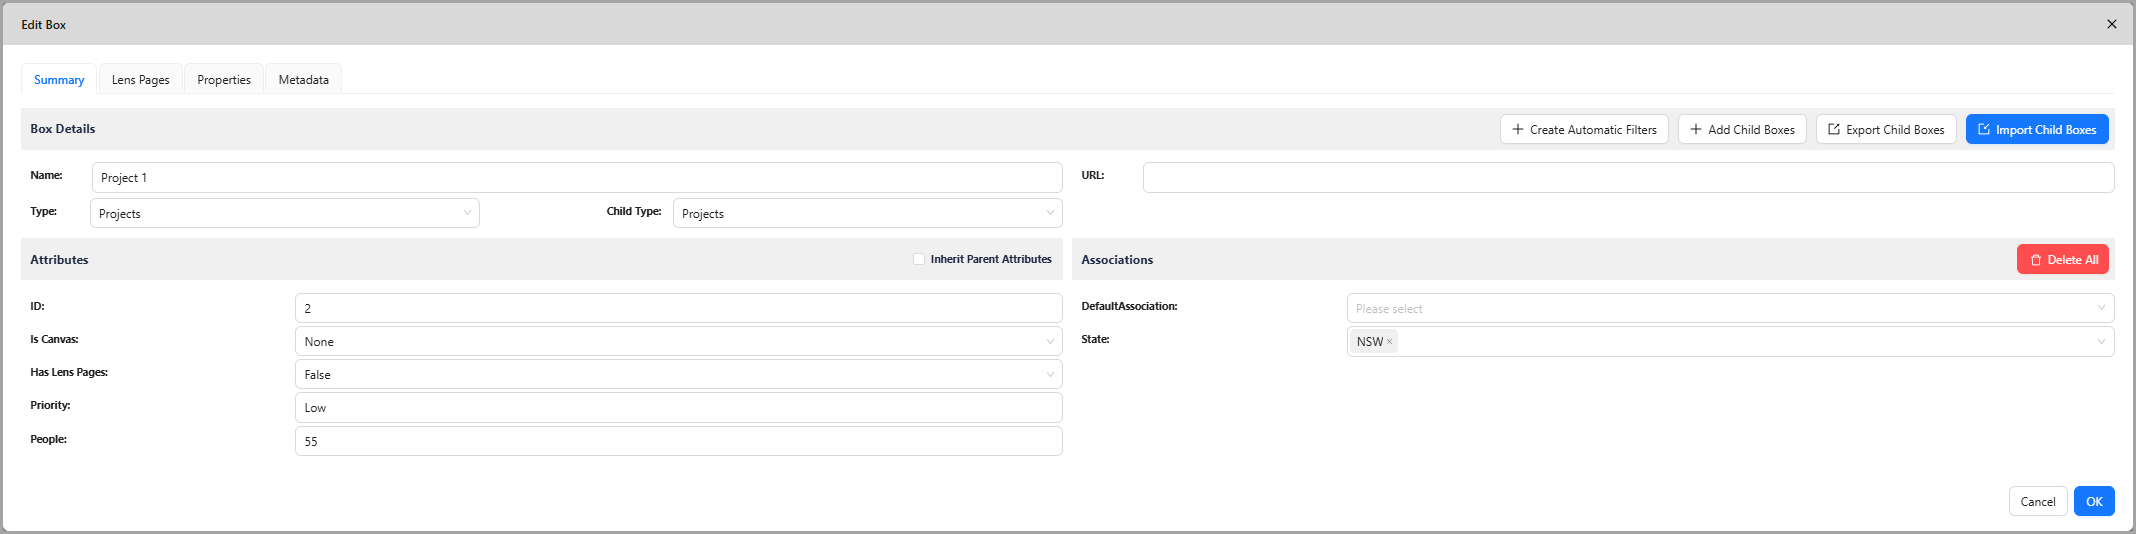
-
Check under Associations if there is an entry field which reveals the State(s) the Project box is joined to If there is NO entry field, then do not use this attribute's name.
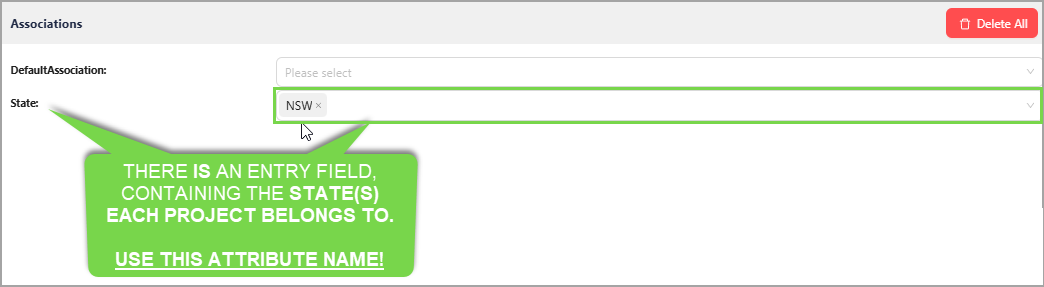 Here we have an entry field that lists the state(s) a project box is joined to.
As such, we used the association attribute name
Statein our render function.
-
You can use this method for any name based illustration to find the correct association attribute name to insert in your render function.
2.7.2.2. number_1-3
Given this illustration only aggregates the People attribute, we assigned number_1 to People and set the others to blank ("").
No further changes required.
2.7.2.3. boxes
The final change, we set the globalBoxUuid to the UUID of the box that contains all the Project boxes. Here is the method we used for this:
-
In
Edit Mode, click on the box that contains all the boxes you wish to aggregate (in this example, the box labelled PROJECTS)
-
Click on the
Metadatatab and copy the Box UUID
Pictured above is the same UUID we used from the illustration, in the render function for the boxes variable.
2.8. Modifications
You can modify the provided template to make various types of aggregation.
2.8.1. Restrict number of attributes to sum
Adding more attributes
If you want to add more attributes, you add more Constants.
For example, you can add this to the end of your Constants:
    "number_4": "4th_attribute_name",
    "number_5": "5th_attribute_name",
    "number_6": "6th_attribute_name"
You then need to add them to the aggregate variable, using the same example it would look like this:
    {
      "name": "aggregate",
      "sourceType": "expression",
      "expression": "variables.boxes.sum(b => (toNumber(b[constants.number_1]) + toNumber(b[constants.number_2]) + toNumber(b[constants.number_3]) + toNumber(b[constants.number_4]) + toNumber(b[constants.number_5]) + toNumber(b[constants.number_6])) * (strCount(b[constants.association], current.Name) > 0))"
    },
You can see all six constants being added above.
Notice how we have brackets enclosing the sum of all six attributes, ensure this is kept so the multiplication of the criteria is done correctly.
Removing attributes
To remove the number of attributes to sum, you just clear the value of the constants.
For example, if you want to sum only one attribute, your Constants section would look like this:
  "constants": {
    "association": "association_attribute_name",
    "number_1": "1st_attribute_name",
    "number_2": "",
    "number_3": ""
  },
You do not need to edit anything else.
While you could remove the brackets around toNumber(b[constants.number_1]), if you change your mind and decide to add more attributes you will need them again.
As such, it's best advised you keep the enclosing brackets around your constant, even if there is only one.
2.8.2. How to Count or Average instead of Sum
Count
- Replace
sumin theaggregatevariable withcount - Remove all constants from the
aggregatevariable
Your aggregate variable should now look like this:
    {
      "name": "aggregate",
      "sourceType": "expression",
      "expression": "variables.boxes.count(b => (strCount(b[constants.association], current.Name) > 0))"
    },
This modified aggregate variable only containing the condition that checks for an association between the boxes.
Average
- Replace
sumin theaggregatevariable withavg
Your aggregate variable should now look like this:
    {
      "name": "aggregate",
      "sourceType": "expression",
      "expression": "variables.boxes.avg(b => (toNumber(b[constants.number_1]) + toNumber(b[constants.number_2]) + toNumber(b[constants.number_3])) * (strCount(b[constants.association], current.Name) > 0))"
    },
This modified aggregate variable still contains the attributes as it needs to sum them and average them accordingly.
2.8.3. How to show aggregate on box hover only
This is still simple to do, it just requires you to move your badge18 box property value into an attribute.
-
To do this, you should create a new variable like the one below and name it to
badge(just badge will do).{
"name": "variable",
"sourceType": "expression",
"expression": ""
}, -
Then, paste the value of
badge18box property into the new variable . Here is what that looks like, assuming you haven't modifiedbadge18.{
"name": "badge",
"sourceType": "expression",
"expression": "{ \"text\": variables.rounded_aggregate, \"horizontalPositionInPercent\": 35, \"verticalPositionInPercent\": 75, \"verticalAlignment\": \"none\", \"horizontalAlignment\": \"none\", \"borderRadius\": 5, \"backgroundColor\": \"none\", \"textColor\": \"#000000\", \"width\": \"20%\", \"heightInPixels\": 15, \"fontFamily\": \"Arial\", \"textSizeInPixels\": 12 }"
}, -
Modify the
badge18box property to have this new value:"if (current.Name == highlighted.Name) { variables.badge } else { None }"This is what the entire
boxPropertyExpressionssection should look like now:"boxPropertyExpressions": {
"badge24": "if (current.Name == highlighted.Name) { variables.badge } else { None }""
},
Now, when you mouse over a box that has this render function you should see the value. Otherwise, it will not show.
Typically you do this by creating a Lens and turning it on, otherwise to test you can just turn on the Render Function from the Advanced Box Types menu.
Otherwise, hovering over a box won't show anything.
2.8.4. How to do Two Level Aggregation
If you have forgotten what Two Levels referred to, click here.
-
So far, the render function we have discussed was for One Level
-
You can either copy the respective preconfigured JSON located at the end of this guide and re-setup your Render Function accordingly, or modify your existing Render Function.
-
We recommend at least trying to do it manually once to gain a greater appreciation for how aggregation works
You will need to :
- Add a new constant
- Add a new variable
- Modify the
aggregatevariable
Here are the steps.
-
Add the following new constant, I would suggest below the existing
associationconstant:"association_2": "association_attribute_name_2",
-
Add the following new variable, I would suggest placing it below the existing
boxesvariable.{
"name": "boxes_2",
"sourceType": "globalBoxChildrenById",
"globalBoxUuid": "boxes_2_uuid"
},
-
Replace the expression of the
aggregatevariable with the new two level expression:variables.boxes_2.sum(b => if (strCount(b[constants.association_2], current.Name) > 0) { variables.boxes.sum(s => if (strCount(s[constants.association], b.Name) > 0) { toNumber(s[constants.number_1]) + toNumber(s[constants.number_2]) + toNumber(s[constants.number_3]) } else { 0 }) } else { 0 })
Explanation
Instead of adding the boxes immediately to your aggregate boxes, such as:
- Adding all Applications that belong to Business Functions (Business Functions -> Applications)
You are now adding boxes that join to your immediate aggregate boxes, such as:
- Adding all Processes that belong to your Applications, which in turn belong to your Business Functions
Processes>Applications>Business Functions
As such, when you configure your new association_2 constant, you need to specify the Association Attribute Name that joins those boxes to your immediate boxes. e.g. JOIN TO Applications
Using the same Business Functions, Applications, and Processes example here is what your constants would look like:
  "constants": {
    "association": "JOIN To Business Functions",
    "association_2": "JOIN TO Applications",
    "number_1": "Development Cost",
    "number_2": "Maintenance Cost",
    "number_3": "Miscellaneous Cost"
  },
attributes are now of different boxes-
In a One Level scenario, the attributes specified in
number_1-3belonged to Applications. -
In a Two Level scenario this changes, the attributes specified now belong to the Processes, which are the boxes that join the immediate boxes.
Additionally, you need to specify the boxes_2 variable.
To do this, with the current example you would:
- Click on the box that contains the Process boxes
- Copy the UUID located on the top right of the Edit Menu Box
boxes and boxes_2 UUIDs should not matchIf they do, you have accidentally included the same children boxes twice.
- Still using the same example it means one of two things:
- You have included the box that contains your Applications twice
- You have included the box that contains your Processes twice
To view a complete example, please look at the prefilled JSON examples for Two Level Aggregation that includes UUIDs at the end of this guide.