Release 3.1.6
We are pleased to present Enterprise Lens 3.1.6. May 2024
| TABLE OF CONTENTS |
|---|
| 1. Easily Hide/Show Box Types |
| 2. Add New Boxes to a Story |
| 3. New Role Abilities (Exporting and Importing) |
| 4. Legends |
| 5. Jira Codes |
1. Easily Hide/Show Box Types
This new feature enables users to easily easily hide a Box Type that is part of a Story. To use this feature, it also uses the concept of Power Lenses and Power Lens groups.
Power Lens Wizard can be accessed in edit mode, towards the bottom of the right-hand menu, in a tab called "Power Lenses".
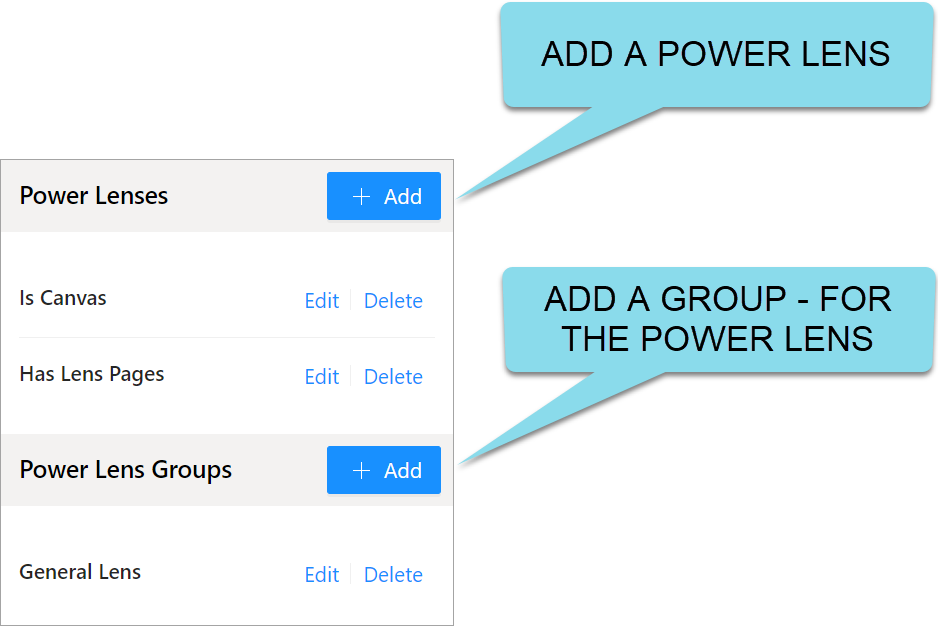
The process to follow is create the Power Lens first and then apply that Power Lens to a Power Lens Group.
To create a new Power Lens, click the + Add button on the right-hand side. Then a form called Add Power Lens will appear.

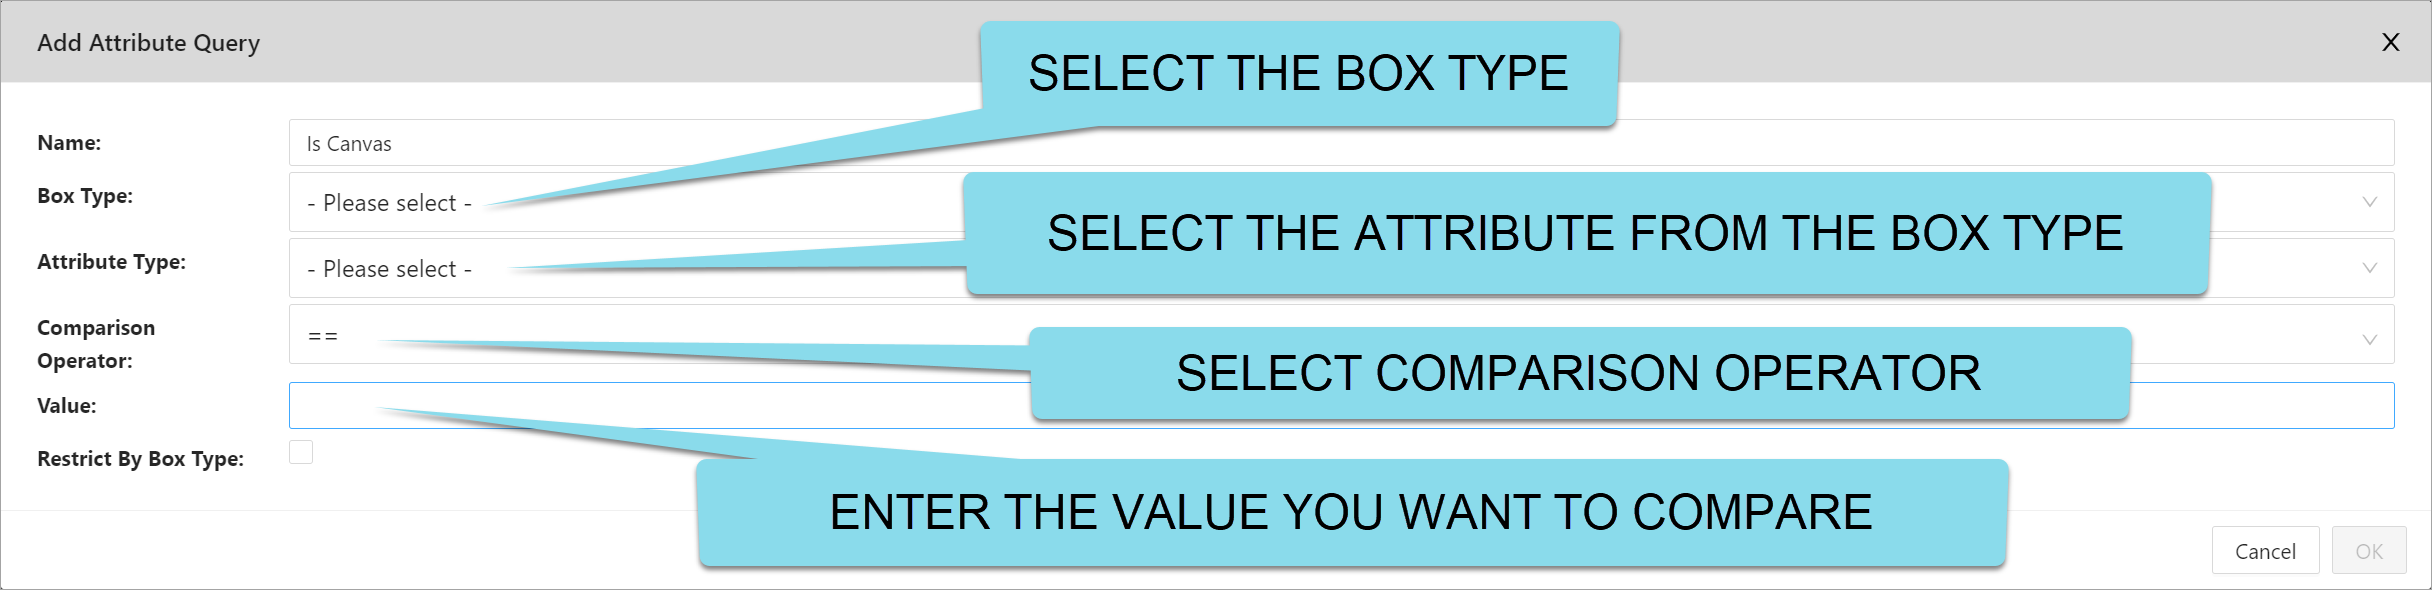
In the image above, you will now select the Add Box Type Query. This will present the Add Box Type Query Form.
Simply select your Box Type and Tick Show Box Type like below.

In this form, you are building a query that the Power Lens will carry out, based on a box type. This feature will enable users to show OR hide a full set of box types. Below are the options to create such a query:
| Options | Description | Examples |
|---|---|---|
| Name | This is the name of the query you are building. It is automatically set the same name as your Power Lens name. TIP: When there are multiple queries within the same Power Lens, you should make the name different to the Power Lens name. | |
| Box Types | Here you select what box type you specifically want to hide or affect. | |
| Show Box Type | This will hide the box type - that you selected above - from your illustration. If it does have a fixed percentage, then this feature will only hide the boxes, but it will not remove the space that they used to occupy. | If you want the remaining box types to occupy the space that the hidden box type took up, then you have to make sure that the Layout Weight of your box types is set to default and doesn't have a fixed percentage. Note that even though you have hidden a box type, this feature respects any associations that have been created with that box type. |
| Show Boxes | This will show any boxes in the same box type. This applies when you have boxes hidden via the Left Hand menu. | A box type called "Project Base", might have child boxes with box type "Projects". All of these boxes will be shown |
| Keep Hidden Boxes in Illustration | This will make the selected box type and it's child boxes invisible. However, it maintains the space that they used to occupy. This is useful for when you want to hide a box type, but want to keep the layout of the illustration the same. |
2. Add new Boxes to a Story
In previous versions of Enterprise Lens, when you created a Story, all the Boxes from a Box Type that were part of the Story at the time were saved. You are now able to create new boxes which will always be available across all saved states in an Illustration.
Previously, any boxes you add to a saved state (story) would not carry through to new stories.
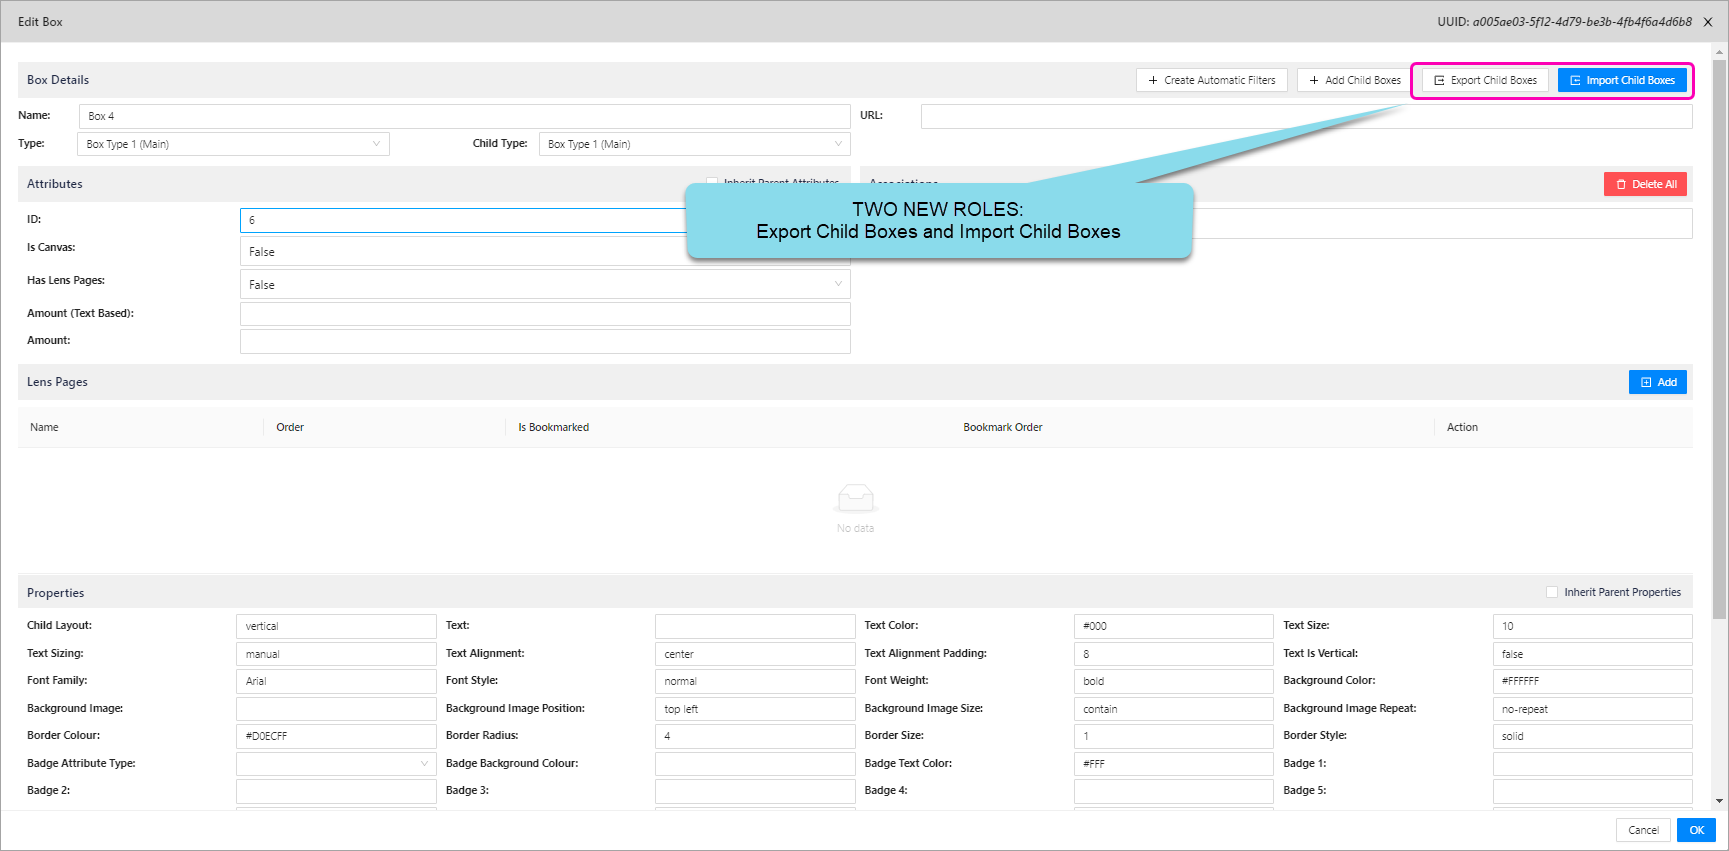
3. New Role Abilities (Exporting and Importing)
With this new release comes more granular permissions on who can import or export child boxes. You can add the following Abilities to roles:
ImportChildBoxesExportChildBoxes
When you open the Edit Box form, for ANY Box, you will be presented with two new roles at the top of the form.
You typically Export and Import from the same box within the Illustration
 Please note that the example also has
 Create Automatic Filters and Add Child Boxes in the Edit Box form , but they may not be present as it depends on your access privileges.
Export Child Boxes
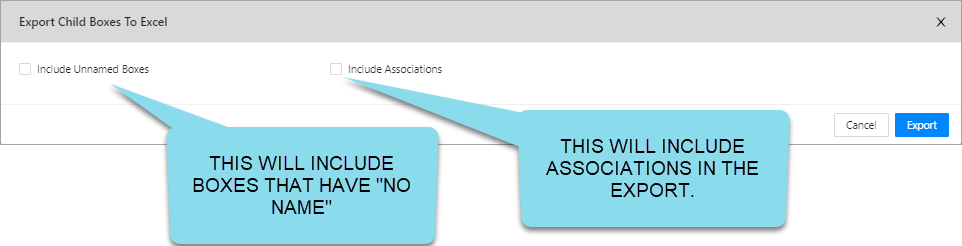
To export the children box of a parent, simply click on a Box and select Export Child Boxes. This will present the Export Child Boxes to Excel form:
When you click **Export **, it will generate an Excel Spreadsheet that will look like this:
Functionality:
If you add new rows in Excel (from row E3 downward), they will be treated as new boxes within the Illustration.
If you add new columns, they will be treated as new attributes. (If you delete the column name in row 2 above then that column will NOT be imported)
You can edit the existing boxes and their attribute values as you please.
Once you have finished modifying the Excel file, save it and load it into the illustration via Import Child Boxes.
Import Child Boxes
To Import from Excel, simply click on a box within the Illustration that you just used the Export Child Boxes functionality and click Import Child Box.

Now you can drag and drop your excel file into the Box or click within the blue dashed border and navigate and find your excel spreadsheet (by default this is the downloads directory in your personal )
When you click Import, it will load the Excel data directly into the Illustration.
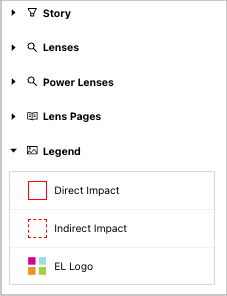
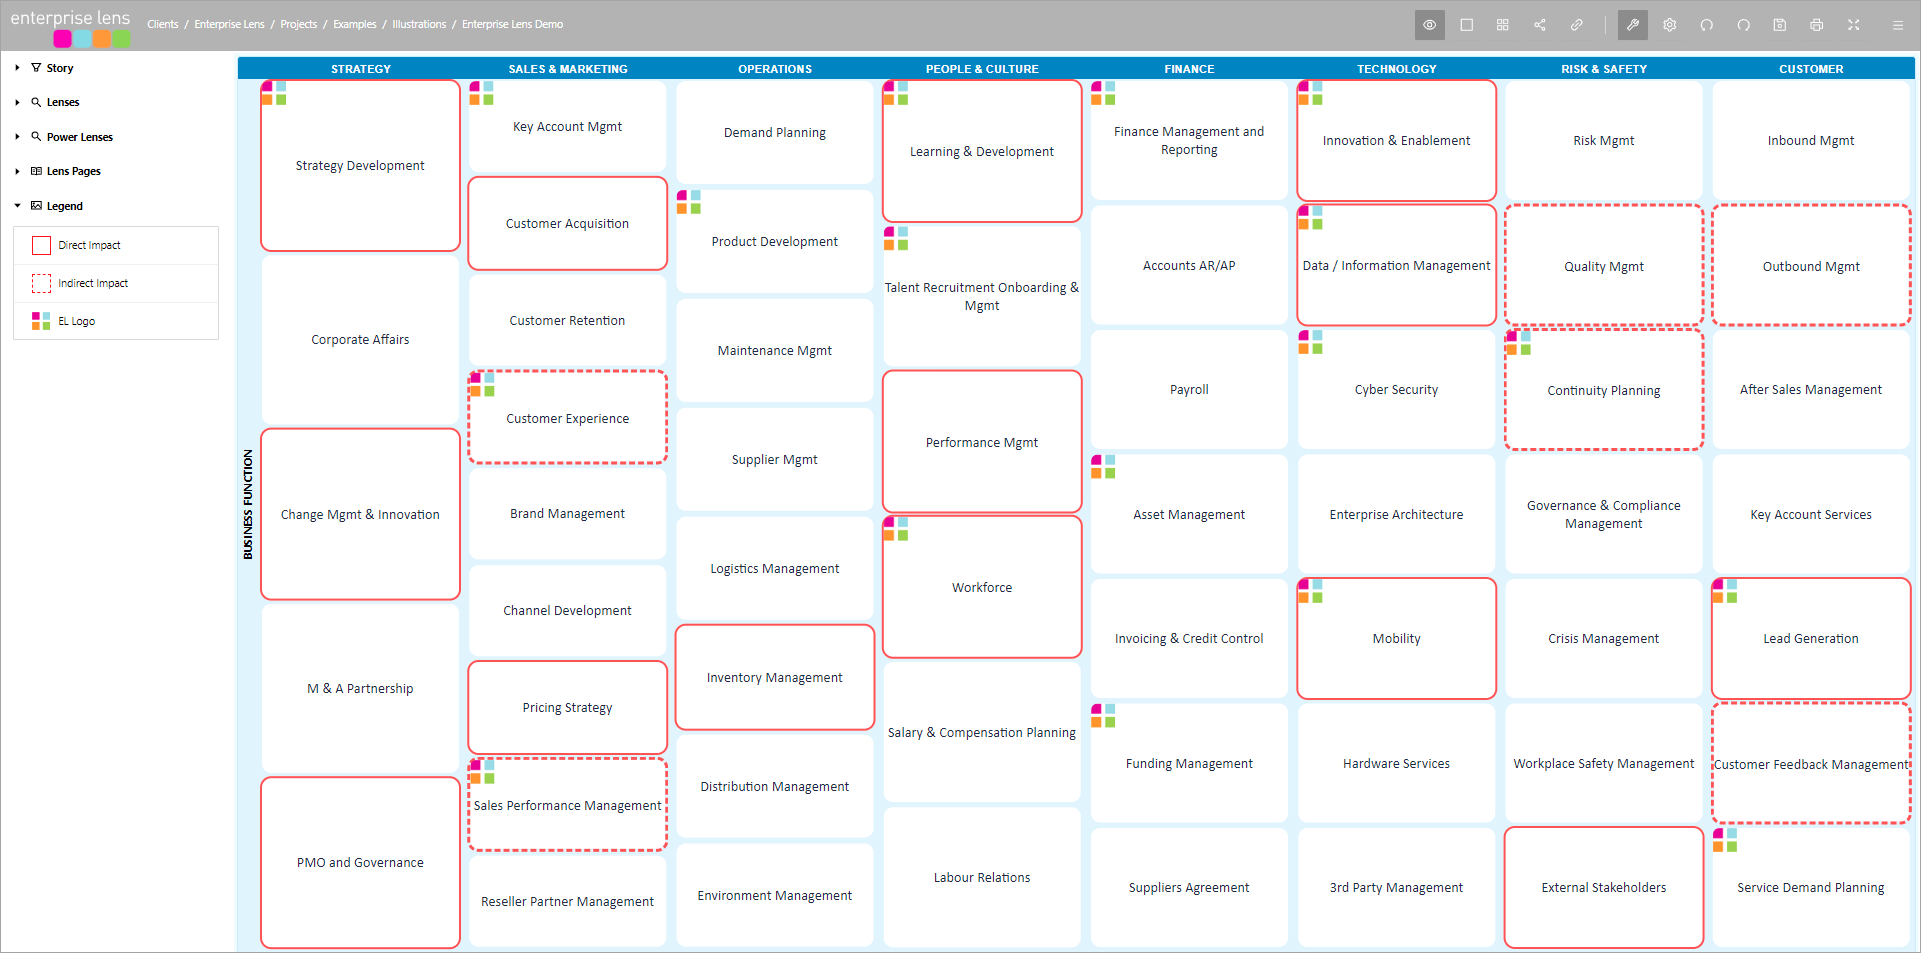
4. Legends
Legends are an easy way to communicate what a Lens means. They provide a shortcut in understanding what a Lens is expressing when text is not appropriate.
EXAMPLE: You may want to use a legend to show which Lenses indicate a direct or an indirect impact to your business.
- The red solid border indicates that there is a direct impact on a business function from the program of work, where as the red dashed border indicates an indirect impact. We have also included a logo example to show how it can be used within a legend.
Legends should reflect the characteristics (i.e. colour, line style etc.) of your Lenses.
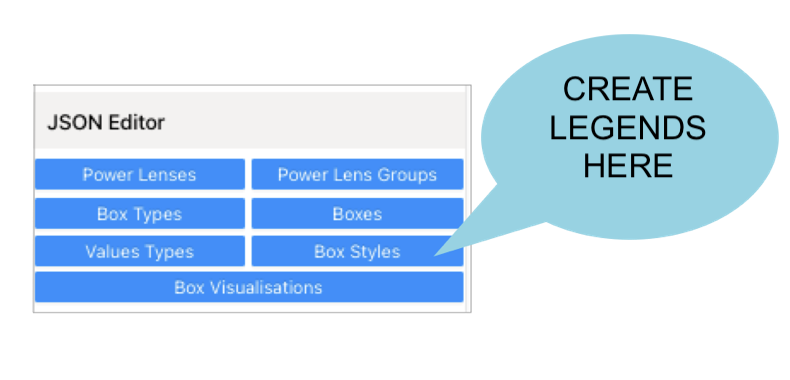
Legends are created in the Box Styles section in the the Right Hand menu under the JSON Editor, see below.
This is example JSON code used that created a Legend entry.
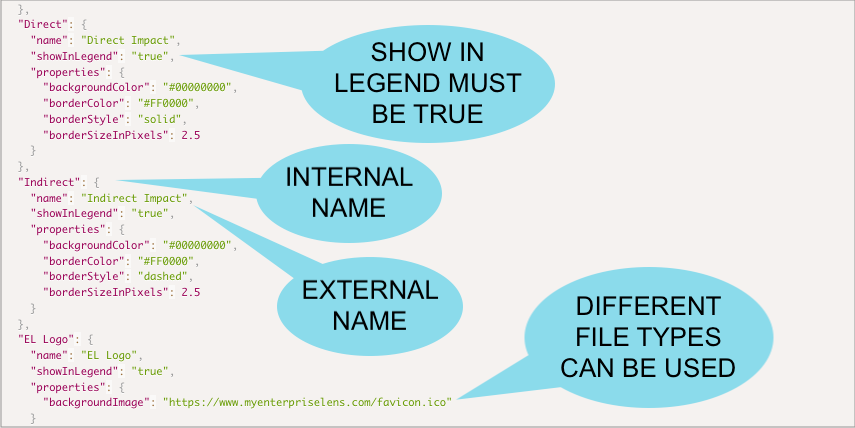
Different file types (such as png, jpeg, ico and gif) can be used within legends to show icons rather than a simple box border colour or background colour etc. This allows different types of Lenses, such as a logo, to be replicated in the legend.
Properties of a legend can be manipulated. This means that characteristics (i.e. colour, border style, border size and background colour) can be changed to mimic the Lens.
In order to view your legend in the Right Hand menu, you must tick Show Legend Menu, located at the top of the Left Hand Menu, as below.
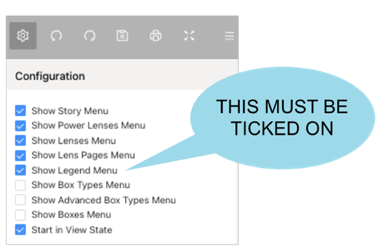
After selecting Show Legend Menu, you should be able to view the legends you have created in the Left Hand Menu
5. Jira Codes
Bugs
EL-674 View and Edit mode Horizontal and Vertical spacing would default to 2 pixels. Now it can be set to 0 pixels
EL-681 On a failed login the user cookies were not being cleared
EL-527 When you select "Select from Import Types" on the Edit-Box form nothing happened
New Features
EL-635 Power Lens Editor - similar functionality to Lens Editor but more powerful
EL-680 Two additional security roles have been created for importing and exporting child boxes
EL-682 Ability to create an Illustration from your own custom Template(s). This is in addition to the Default Template
EL-683 Ability to easily include new boxes AFTER a Story has been created and the state is saved